🚗 Attention Carplay Merchants! 🚗
Introduction
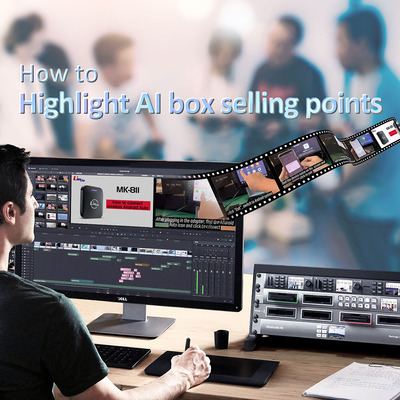
Whether it is the CP series or the MK series, focusing on product introductions and functional operation demonstrations always attracts a lot of attention. Providing tutorials, shooting steps, software installation, and video production ideas makes this an in-depth article. 📚🔍
Therefore, screenshots and video demonstration steps are crucial as they help consumers deeply understand the product’s functions and operational steps. This article will teach you how to shoot products, providing detailed steps from downloading the APK to post-processing. 📸✨
Tools You Need:
- 🖥️ Computer
- 📀 USB (for CP series)
- 💾 Memory card (TF card, for MK series)
How to Install the APK?
CP Series (#CP301 #CP305)
- Download the APK: Get it from our trusted source. 💻
- Save to USB: Keep your files organized and ready to go. 🗂️
- Connect and Insert: Plug in your device and insert the USB. 🔌
- Open Factory Mode: Go to settings and use the password 1268. 🔒
- Install with APK Manager: It’s quick and easy. ⚙️
- Open the App: Return to the product interface and launch the app. 🚀
- Capture the Moment: Use the camera button on the right side of the interface to take stunning shots. 📷💥
MK Series (#MK811 #MK665)
- Download the APK: Get it from our trusted source. 💻
- Save to TF card: Keep your files organized and ready to go. 🗂️
- Connect and Insert: Plug in your device and insert the TF card. 🔌
- Install with APK Manager: It’s quick and easy. ⚙️
- Open the App: Return to the product interface and launch the app. 🚀
- Capture the Moment: Use the camera button on the right side of the interface to take stunning shots. 📷💥
How to Load the Product into the Computer
Insert the product into the computer (do not use a Mac), and wait about 1-2 minutes for the device to be read. The videos and pictures you just took will be located in the following three folders:
- 🗂️ DCIM
- 🎞️ Movies
- 🖼️ Pictures


Carefully check these three folders, and then you can create the video theme and steps. 🎬✨
Directions for Creating Video Themes
Based on my experience, I have summarized the common issues customers face when using the product and how to solve them. Here are the details to focus on when creating a video:
- First Connection: How to connect for the first time?
- Step 1: Make sure your car screen has an Apple Carplay icon. 🖥️
- Step 2: Locate the wired Carplay connector (USB A or Type-C). 🔍
- Step 3: Delete wired Carplay connection from the screen before plugging in the product. 🗑️
- Step 4: If possible, delete the Bluetooth and Wi-Fi pairing history from the car screen (this step ensures that the phone does not automatically connect to the screen). 🗑️
- Function Operation: Record videos demonstrating the use of wireless Carplay, Android Auto, Apps, YouTube, Netflix, etc. 🎥📱
3. Creative Videos: Eye-catching videos usually include usage scenarios in the car, people, product details, etc. 🚗✨
Mobile Shooting Techniques and Settings
Choosing Equipment
- Mobile Camera: Use a mobile camera with high resolution and manual control functions, such as iPhone 14 or Samsung Galaxy S23. These features allow you to flexibly adjust shooting parameters to ensure photo quality. 📱📷
- Tripod: Use a tripod to keep your phone stable and avoid blur caused by shaking. 🎛️
- Lighting: Natural light is free and effective, but when indoors or in low light, artificial light sources (such as softboxes or ring lights) provide more stable
and controllable lighting effects. 💡
Camera Settings
- Basic Camera Settings: Understand the basics of ISO, shutter speed, and aperture. A low ISO value reduces noise, suitable for static product shooting; a moderate shutter speed avoids shake; an appropriate aperture value controls depth of field. 📸✨
- Manual Mode: Use manual mode for fine adjustments to ensure optimal exposure and focus for each photo. 🔧📷
Post-Processing
Basic Editing
- Adjust Brightness, Contrast, and Color Temperature: Make photos look more natural and professional. 🌟
- Remove Blemishes and Background Clutter: Make the product look cleaner. 🧼✨
Professional Techniques
- Use Layers and Masks for Detailed Processing: Such as local adjustments and repairs. 🖌️🔍
- Introduce Common Editing Software: Such as Adobe Photoshop or Lightroom, these tools can greatly enhance photo quality. 💻📸
Conclusion
Whether it’s the CP series or the MK series, creating high-quality product introductions and functional operation demonstrations is a key way to attract consumers. Through detailed steps and vivid demonstrations, consumers can better understand how to use the product and its features. I hope this article helps you enhance your product presentation, and I invite you to share your shooting results or ask questions, so we can learn and improve together! 💪✨
For any inquiries, please contact me at hank9746015@gmail.com or call me at Whatsapp:+886 0966 332 401

Find me on social media @HankXu on Facebook and Instagram.
Thank you for reading!